
02 / Approach
hello@mixedmatter.design

Approach

Every project starts with a question: how will this space actually be used? The answer shapes everything that follows.

The method

  1. 01

    Ask how it will be used

    Before drawing, we find out who uses the space, when and for what. The brief you arrive with is a starting point, not the answer.

  2. 02

    Decode your references

    Bring images you like. We break them down together into the parts that actually appeal - the light, a material, a proportion, a feeling - so we both know what you are asking for.

  3. 03

    Design the details

    Storage where you need it, clear routes through the space, soft edges where hands and bodies meet it, layered light and tactile materials.

  4. 04

    One fixed fee

    Quoted after our first meeting and paid in stages.

One question, two jobs

In both of these, one question about use turned a single-purpose request into something that does two jobs, for about the same cost.

01

The deck that became a bar

  1. 1 Before

    On a community build in Gifu, Japan, the team was building a deck outside a ground-floor window.

  2. 2 What we asked

    We asked the people who would use it what it was for: selling drinks through the window, which sits higher than the ground, and sitting outside.

  3. 3 What we did

    So the deck became a place to gather. Rocks around it work as seats, and two hinged timber pieces flip up from the deck to support a board below the windowsill, turning it into a fold-out bar counter for serving drinks.

A team project: 20 students from Japan and Hong Kong, built in 11 days. Jasmine Hodgson coordinated the schedule and led one of the four teams.
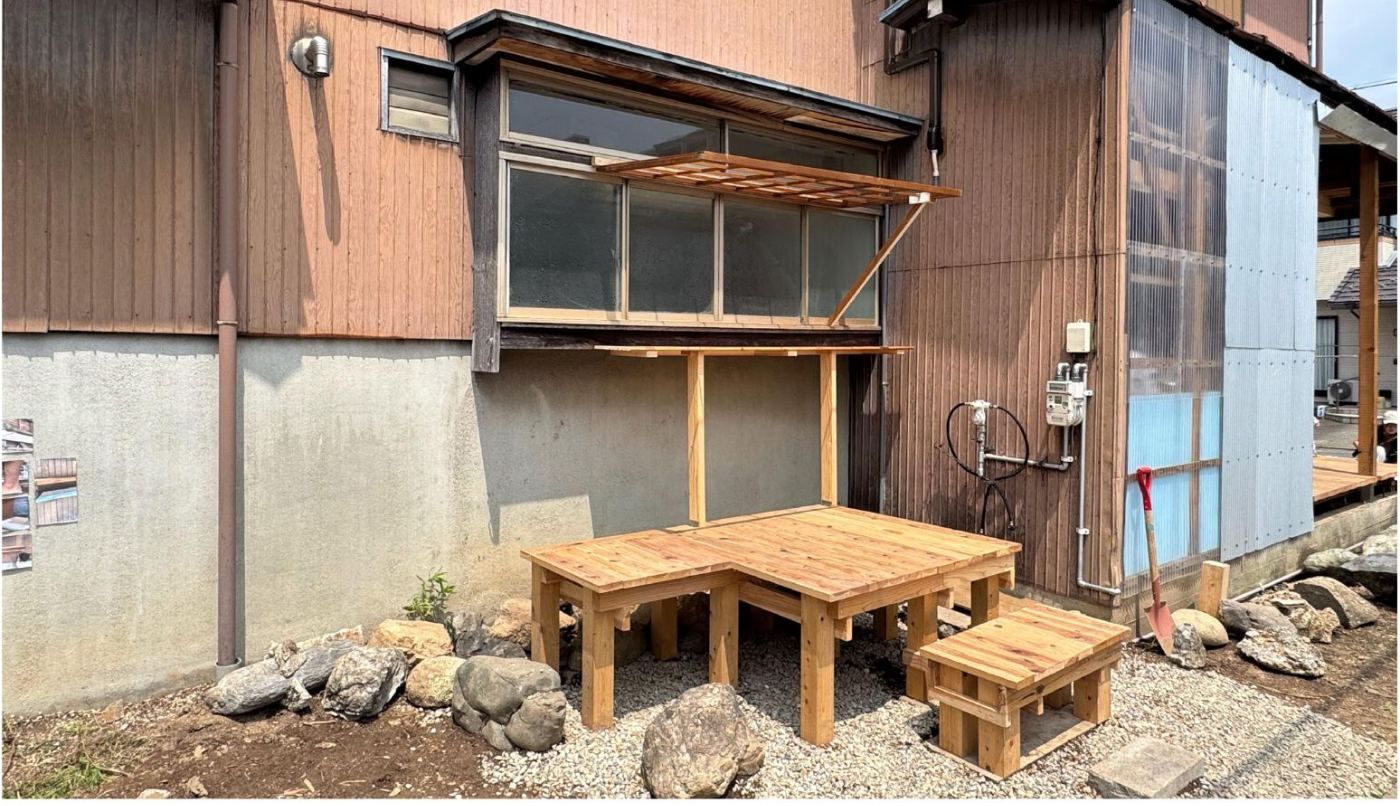
A low timber deck with a built-in table and bench outside a timber-clad house, ringed by rocks
Fig. 01 - The finished deck, with rocks as seats
02

A doorway instead of a wall

  1. 1 Before

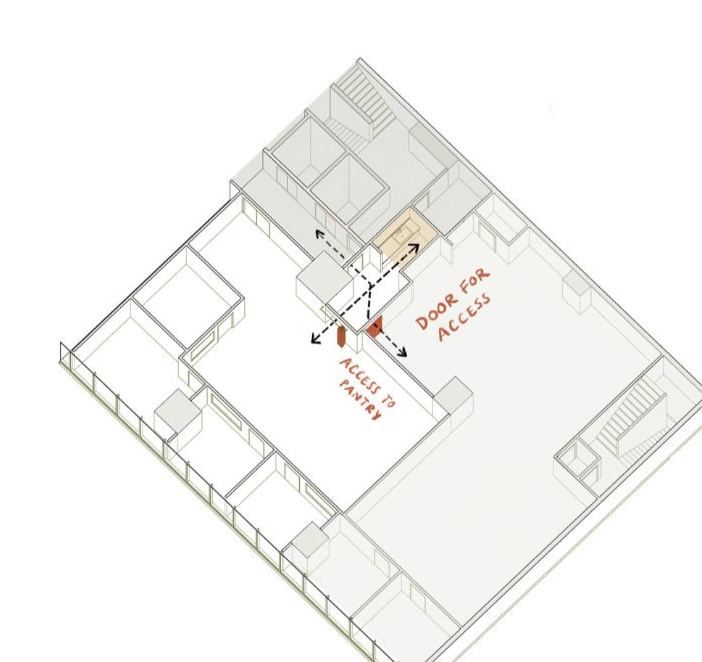
    A non-profit therapy centre could only afford part of an office floor, so two new walls would divide it. The building owner needed direct access from the lift lobby to the rest of the floor, which would have cut the centre off from the pantry.

  2. 2 What we asked

    We asked how the centre would use the space day to day, and what it would lose without the pantry and its water point.

  3. 3 What we did

    We suggested leaving an opening in the new wall, closed with a curtain. It cost about the same as a plain wall, the owner kept their route through, and the centre kept its pantry, which made the space far more useful day to day.

Axonometric of the unit with arrows marking a door for access and the route to the pantry through the new wall
Fig. 02 - The door for access and the route to the pantry

How a project runs

Six stages, each ending with something you can see and sign off before we move on.

  1. 1OnboardingA written brief and a measured survey of your space
  2. 2Concept designLayout plans and a material board you sign off
  3. 3ATechnical packageA set of drawings a contractor can price and build from
  4. 3BFF&E and stylingA schedule of furniture, lighting and finishes
  5. 4Construction supportSite visits and answers to the contractor's questions
  6. 5HandoverA snagging list and a care guide for your materials

Questions

How do fees work?

Each project has a fixed fee, quoted after our first meeting and paid in stages.

Is the first meeting free?

Yes. The first 30-minute meeting is free. Site visits are charged separately.

What size of project do you take on?

Whole homes, renovations, single rooms such as a bathroom or kitchen, and small community spaces.

Tell us about your space

Get in touch